Use Docker to Operationalize the Data Science Prediction
There are many challenges working in machine learning fields. In terms of the time consuming part, one is data preparation, the other one would be operationalizing the model. If you have the right data, building a model actually is a relatively easier part of the whole process. Let us talk about the operationalization of the model. I have used batch files (link) to handle R and python processes and used the task scheduler to schedule a job at a virtual machine in the cloud. But it is probably not the best way to go because the followings:
- It is hard to switch to different visual machine. In other word, the portability is poor.
- You are limited in windows machine, whereas majority of servers in the cloud are using Linux based operation system.
Here I want to explore the possibility of using docker to handle data science operations. It is a modern technology and with great potential to solve the issues I list above.
Docker is a container technology that can package all your artifacts for your application in one folder and move to the host machine (cloud server). Your application will run without worrying about the operating system, hardware and so on. This will fit in with all cloud service vendors like AWS, Azure, GCP, et al. It uses the same concept of container in the shipping industry.
Majority of docker materials and tutorials online are using Nginx or flask, because the end product is a web App. You can easily see the result by browsing the web page. In my case, I would like to use docker for data science purposes. Unfortunately, I don’t find a lot of resources online. I think the following sites help me a lot.
- Docker tutorial site is good for getting started, but it is not specific for data science.
https://docs.docker.com/get-started/
- The following site helps me use docker with data science, but the content are a bit dated (not working anymore) and methods are over simplified for real life project.
https://mlinproduction.com/docker-for-ml-part-1/
I want to achieve the following goals:
- Being able to build customized docker images for data science purposes.
- Training and inference processes are getting data from databases (this is common in real life).
- Try docker compose if there are multiple containers working together (simplify the configuration step).
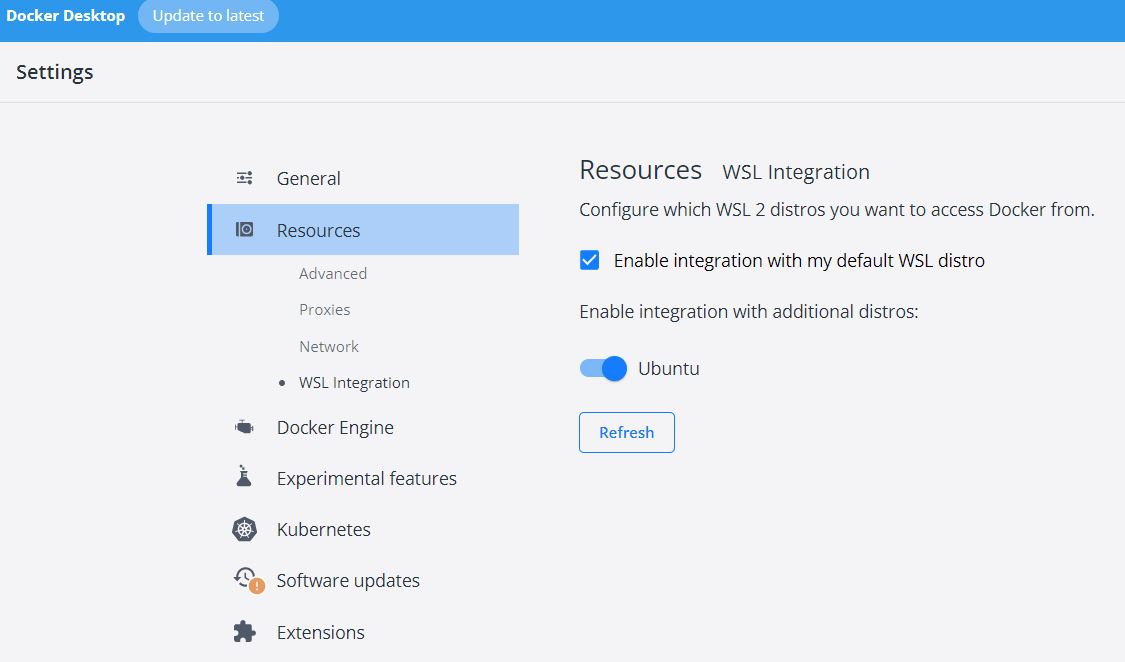
To run docker in windows environment, you will need the following set up.
- Install docker desktop, remember to also check the option to install Windows Subsystem for Linux (WSL2 ). This essentially allows you to have a Linux dev environment in Windows.
- Install Ubuntu app from windows store to be able to use Linux shell to interact with docker desktop. It is a common language in the container world.
- In the docker desktop, configure Ubuntu to integrate with docker(WSL Integration, see below). So you can use Ubuntu shell interact with docker.
- Install VS code and add extension WSL, so I can use the VS code to view Linux subsystem files and be able to make dockerfile or compose yaml file.
Let us take baby steps.
The first step, I want to be able to replicate what Luigi did, but minor modifications are needed to make it work.
I will still use Luigi Patruno’s Boston Housing price data for this exploration. But since he published the blog, the dataset source has been changed, the original code is not working any more. So I will need to make changes to it.
In addition, Luigi used a Jupyter notebook image as his base image, this image is bulky (over 1gb ). For some reason, I cannot launch a jupyter notebook by connecting to the container from the host even though this container runs without issue and I put in the token as suggested. Therefore, I changed it to use python image instead. I use python 3.8 image from docker hub (about 500 mb). it might be ok to build from scratch such as Alpine. But I leave it to the future.
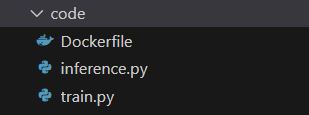
The folder contains the following files.
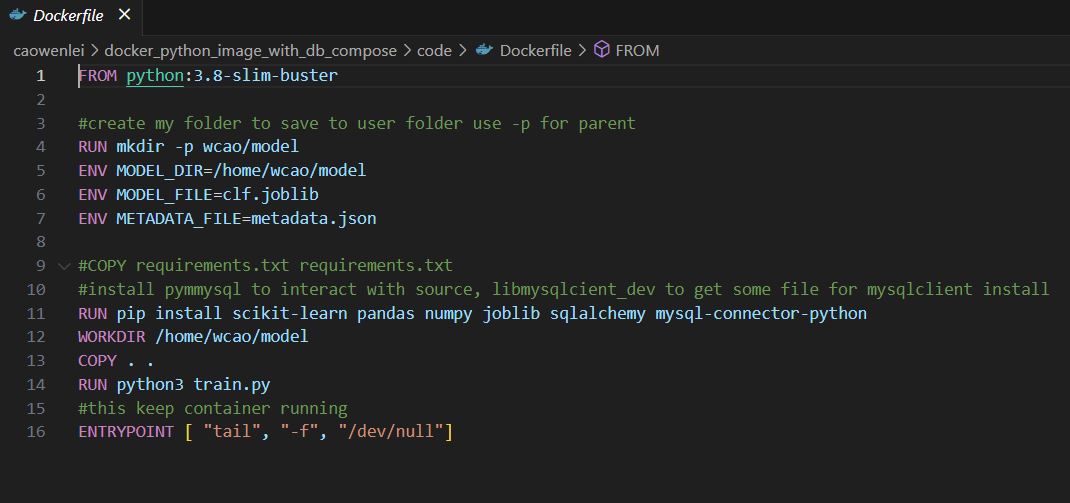
This is the content of dockerfile, which contains instruction to build an image as a blueprint for a container.
dockerfile
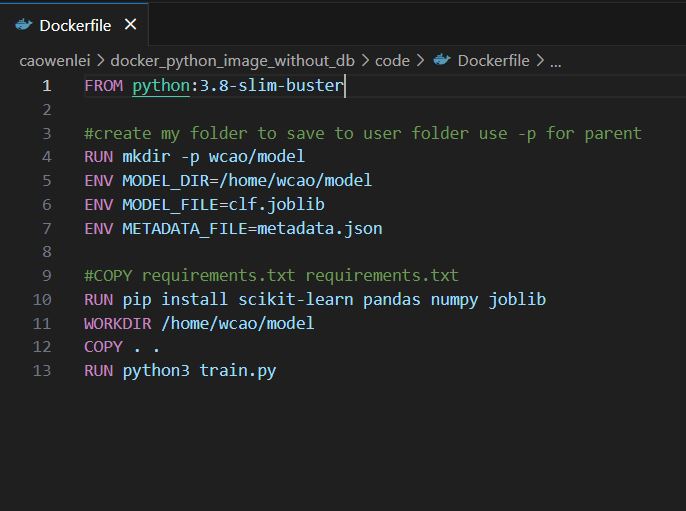
Row 1: get image from docker hub python:3.8 version
Row 4: create folder under home, form home/wcao/model structure
Row 5-7: create environment variables to be used in other files. Those are paths and file names
Row 10: install packages which were not included in core library of python
Row 11: move all file from current folder
Row 13: run python3 train.py while build the image
Train.py
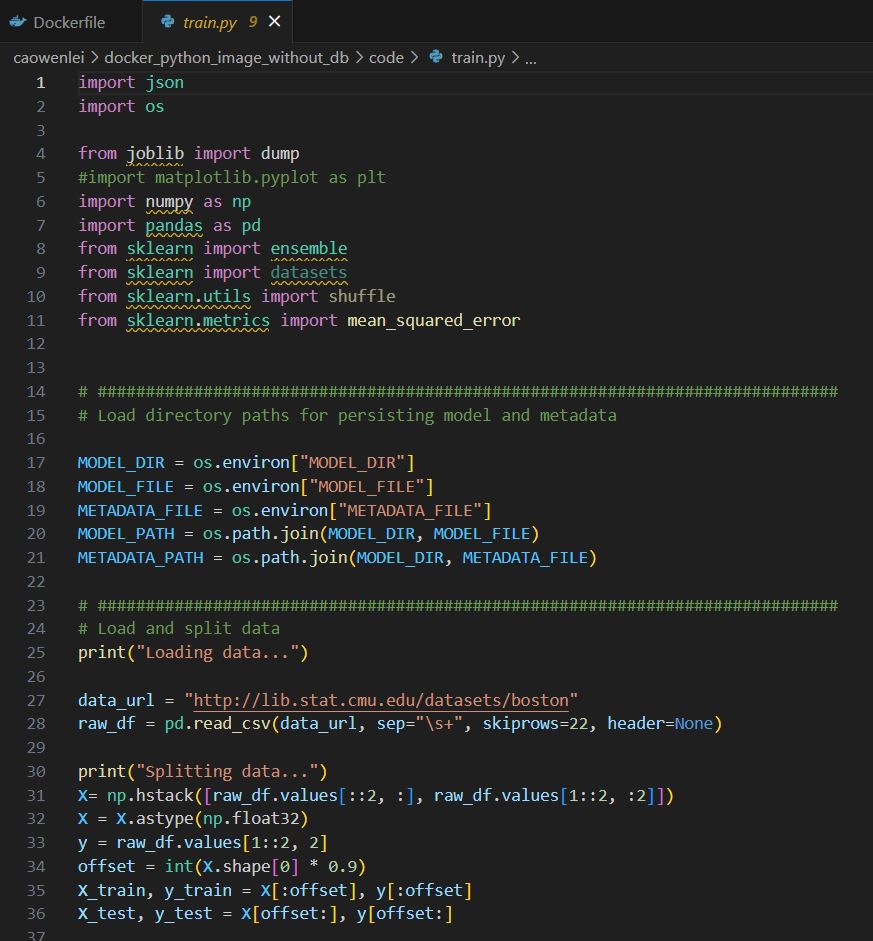
Row 1-11, import necessary packages.
Row 17-21, using environment variables to form the model and metadata paths to be used later.
Row 27-36, getting training data. Due to some value was wrapped to 2nd row, there are some data manipulation between 31-33 using np.hstack, then data was divided into train and test.

Row 40-43, setting up a regressor.
Row 45-50, fit the regressor with train data and get train and test_mse. Save these mse values into metadata.
Row 55-60, dump the model to a file and also save the metadata.
Inference.py
Data steps are similar, so I am going to skip it.

Row 41-44, load the trained model from file generated from training.
Row 46-47, using the model to predict and print out the prediction.
With the file in the folder, let us see how we use docker to run it.
In the Ubuntu shell, navigate where the folder contain the code,
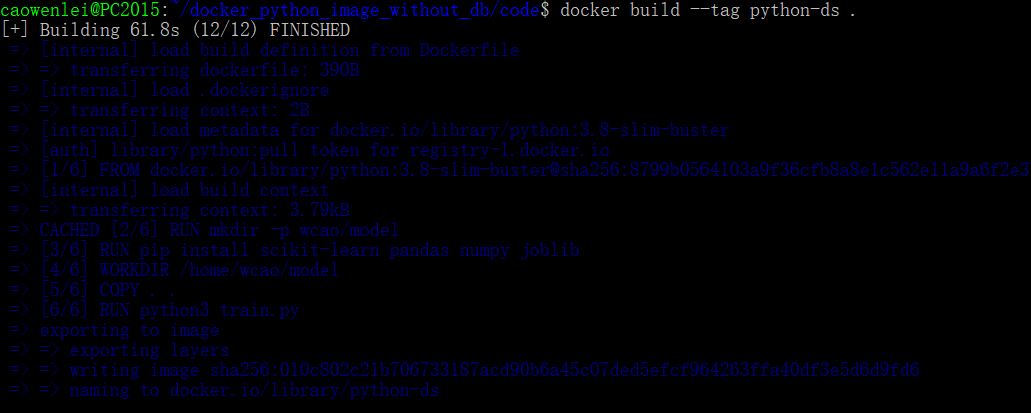
Here I use the build command, giving the name python-ds as image name. don’t forget the dot, which indicate build from the same folder, i.e., using the dockerfile in the current folder to build.
Once built, I can run docker run command to instantiate a container based on the image.

In the docker run command, we use cat command to show content of metdata.json, which is generated during the train.py run. It prints out the two mse values as below, which indicate the training work as expected.
Next we will see if inference is working
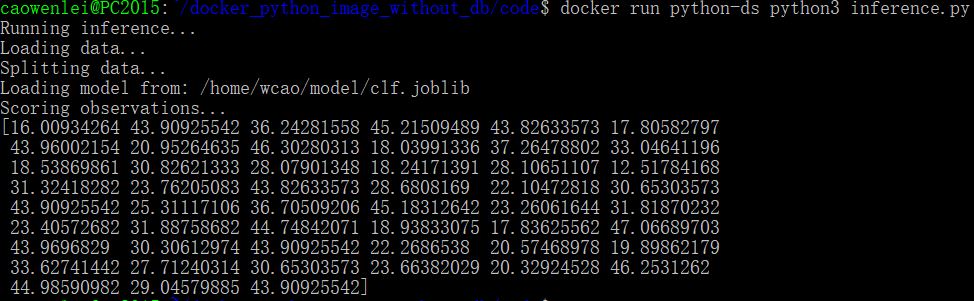
We can run inference.py and get all predictions (10% of original data). So it works fine.
The first step worked as expected.
Let us add some challenges to our process. In real life, oftentimes, we need to query databases to get new data for training and inference.
Let us get data from a database and here I use mysql to simulate where our source data is from. In dev, it is acceptable to have a db container. In the prod, however, it is suggested that we should use a managed cloud database, due to the phantom nature of containers. But it is easy to switch the connection. The process is quite similar.
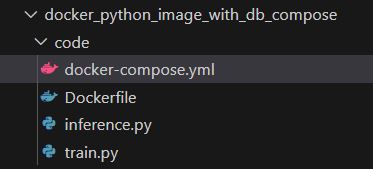
The folder structure of the files.
Since we have a container for data science, we also have another container for mysql. Using docker-compose.yml is a good way to simplify the configuration process. It will create both containers within the same network.
Let us take a look what inside the docker-compose.yml
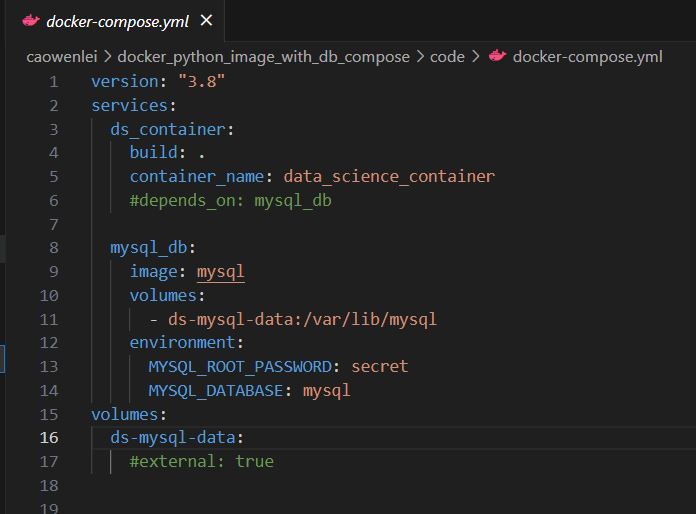
I have two services in this compose file.
Row 3-6, I created a data science service as ds_container. I will build an image from the current folder (I will need to run commands from the current folder) and give the container name data_science_container.
Row 8-14, create mysql_db container from mysql image in docker hub. We map host volume to mysql volume (volume helps persist data even if the container is destroyed). And some environment variables, such as database to use, and password.
I add one more command,
Row 11, in order to deal with database, I add sqlalchemy and mysql-connector-python package
Row 16, this will allow container stand by and not exit, since I will run other commands against the container
Train.py did not change.
Inference.py: I got data from sql query. So I replaced the data extraction part.
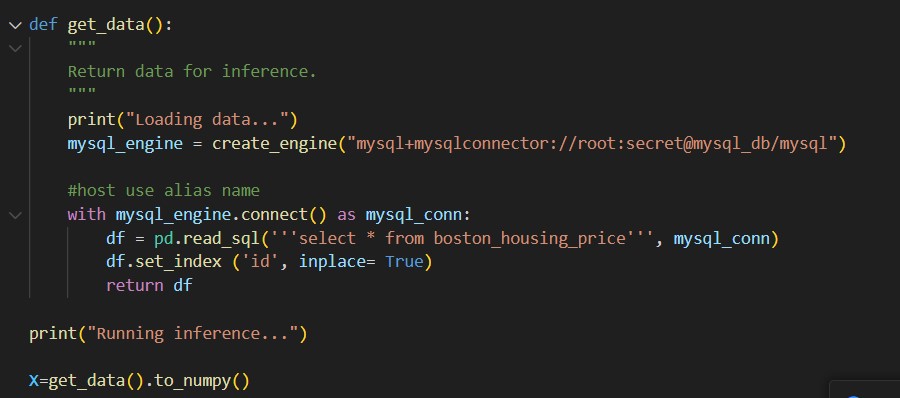
Notice here I use sqlalchemy to create mysql_engine. Notice the special format of connection string.
Database+connector://user:password@host(defined in compose file)/database.
Using the connection, we can get a dataframe from read_sql. Here we get data from boston_housing price table. We have not created this yet. Once we stand up the container, we can create it inside the container.
See this blog for more on mysql connection
https://planetscale.com/blog/using-mysql-with-sql-alchemy-hands-on-examples
Let us give it a shot.

Using docker compose up, we can see two services started and used –d for detached mode, so containers run behind the scene. –remove-orphans is optional since I have some other containers with the same name running.

Using docker ps, we can see what name of container is running.
From here, we know the mysql container’s name is code-mysql_db-1. we can get into mysql containers to create tables and insert some records for testing.

Here we use docker exec to add commands to existing running containers. –it is a command when you want to get inside a container (i:interactive, t: tty). Code-mysql_db-1 is the container name, mysql –p is run mysql command and –p means asking for password. After entering the password, we set it as secret in the compose file. We get a mysql prompt. (in real life we will need encode the pw, see example in this blog)
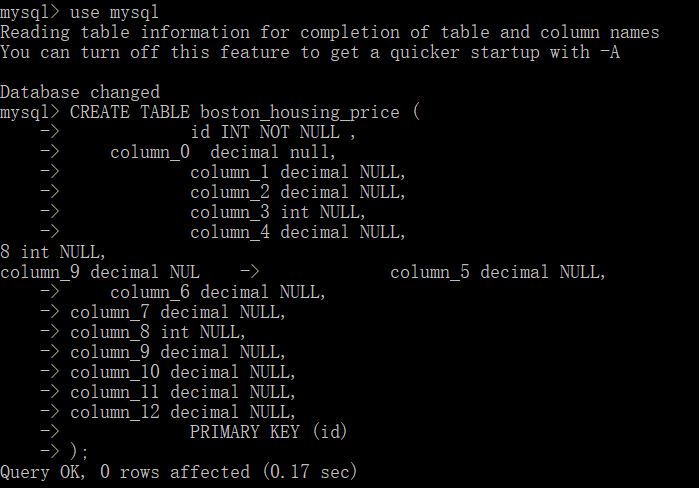
We used mysql database, and created a boston_housing_price table with columns.
Let us assume, there were 3 new data coming in and need us to predict.
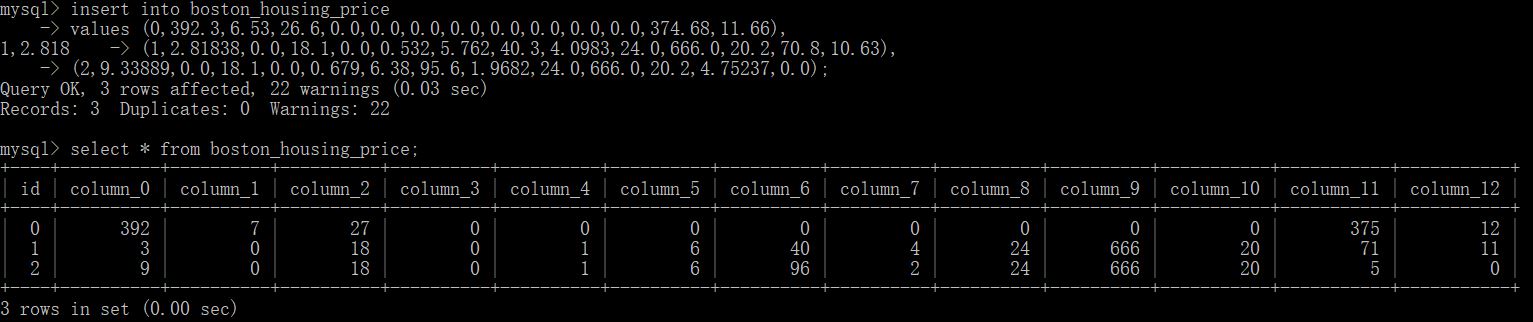
We can insert 3 records like so. We check the values in the table. We can type exit, now we are out of the container. We only use 3 records here, so we should only get three predictions.
Now let us score the data

Since the container is already running, I should use exec, it did give me three score values. So we can successfully get prediction using docker compose.
Once it is done, we can use docker compose down to remove all containers.
It is convenient and easier to deploy anywhere with containers, as long as I have these file in a folder.
The next step, we can use docker swarm or K8s for orchestration, but it is out of the scope of this post.
thanks for following along. Here is the folder contain file you need if you want to repeat.
Wenlei